Adventures in Networking

Main menu:

Technical Documents

Raspberry Pi DNS Server

I have been running dual DNS servers on my home network for a while, see my previous post about setting them up: Debian Server on a Thin Client with a Flash Drive

The inevitable finally happened–after a year of faithful service (and years past its expected life), my primary server (the DevonIT box) finally died. I traced it down to a couple of blown capacitors in the power supply, and while I am perfectly capable of replacing them, I decided to use the opportunity to put my Christmas present to good use.

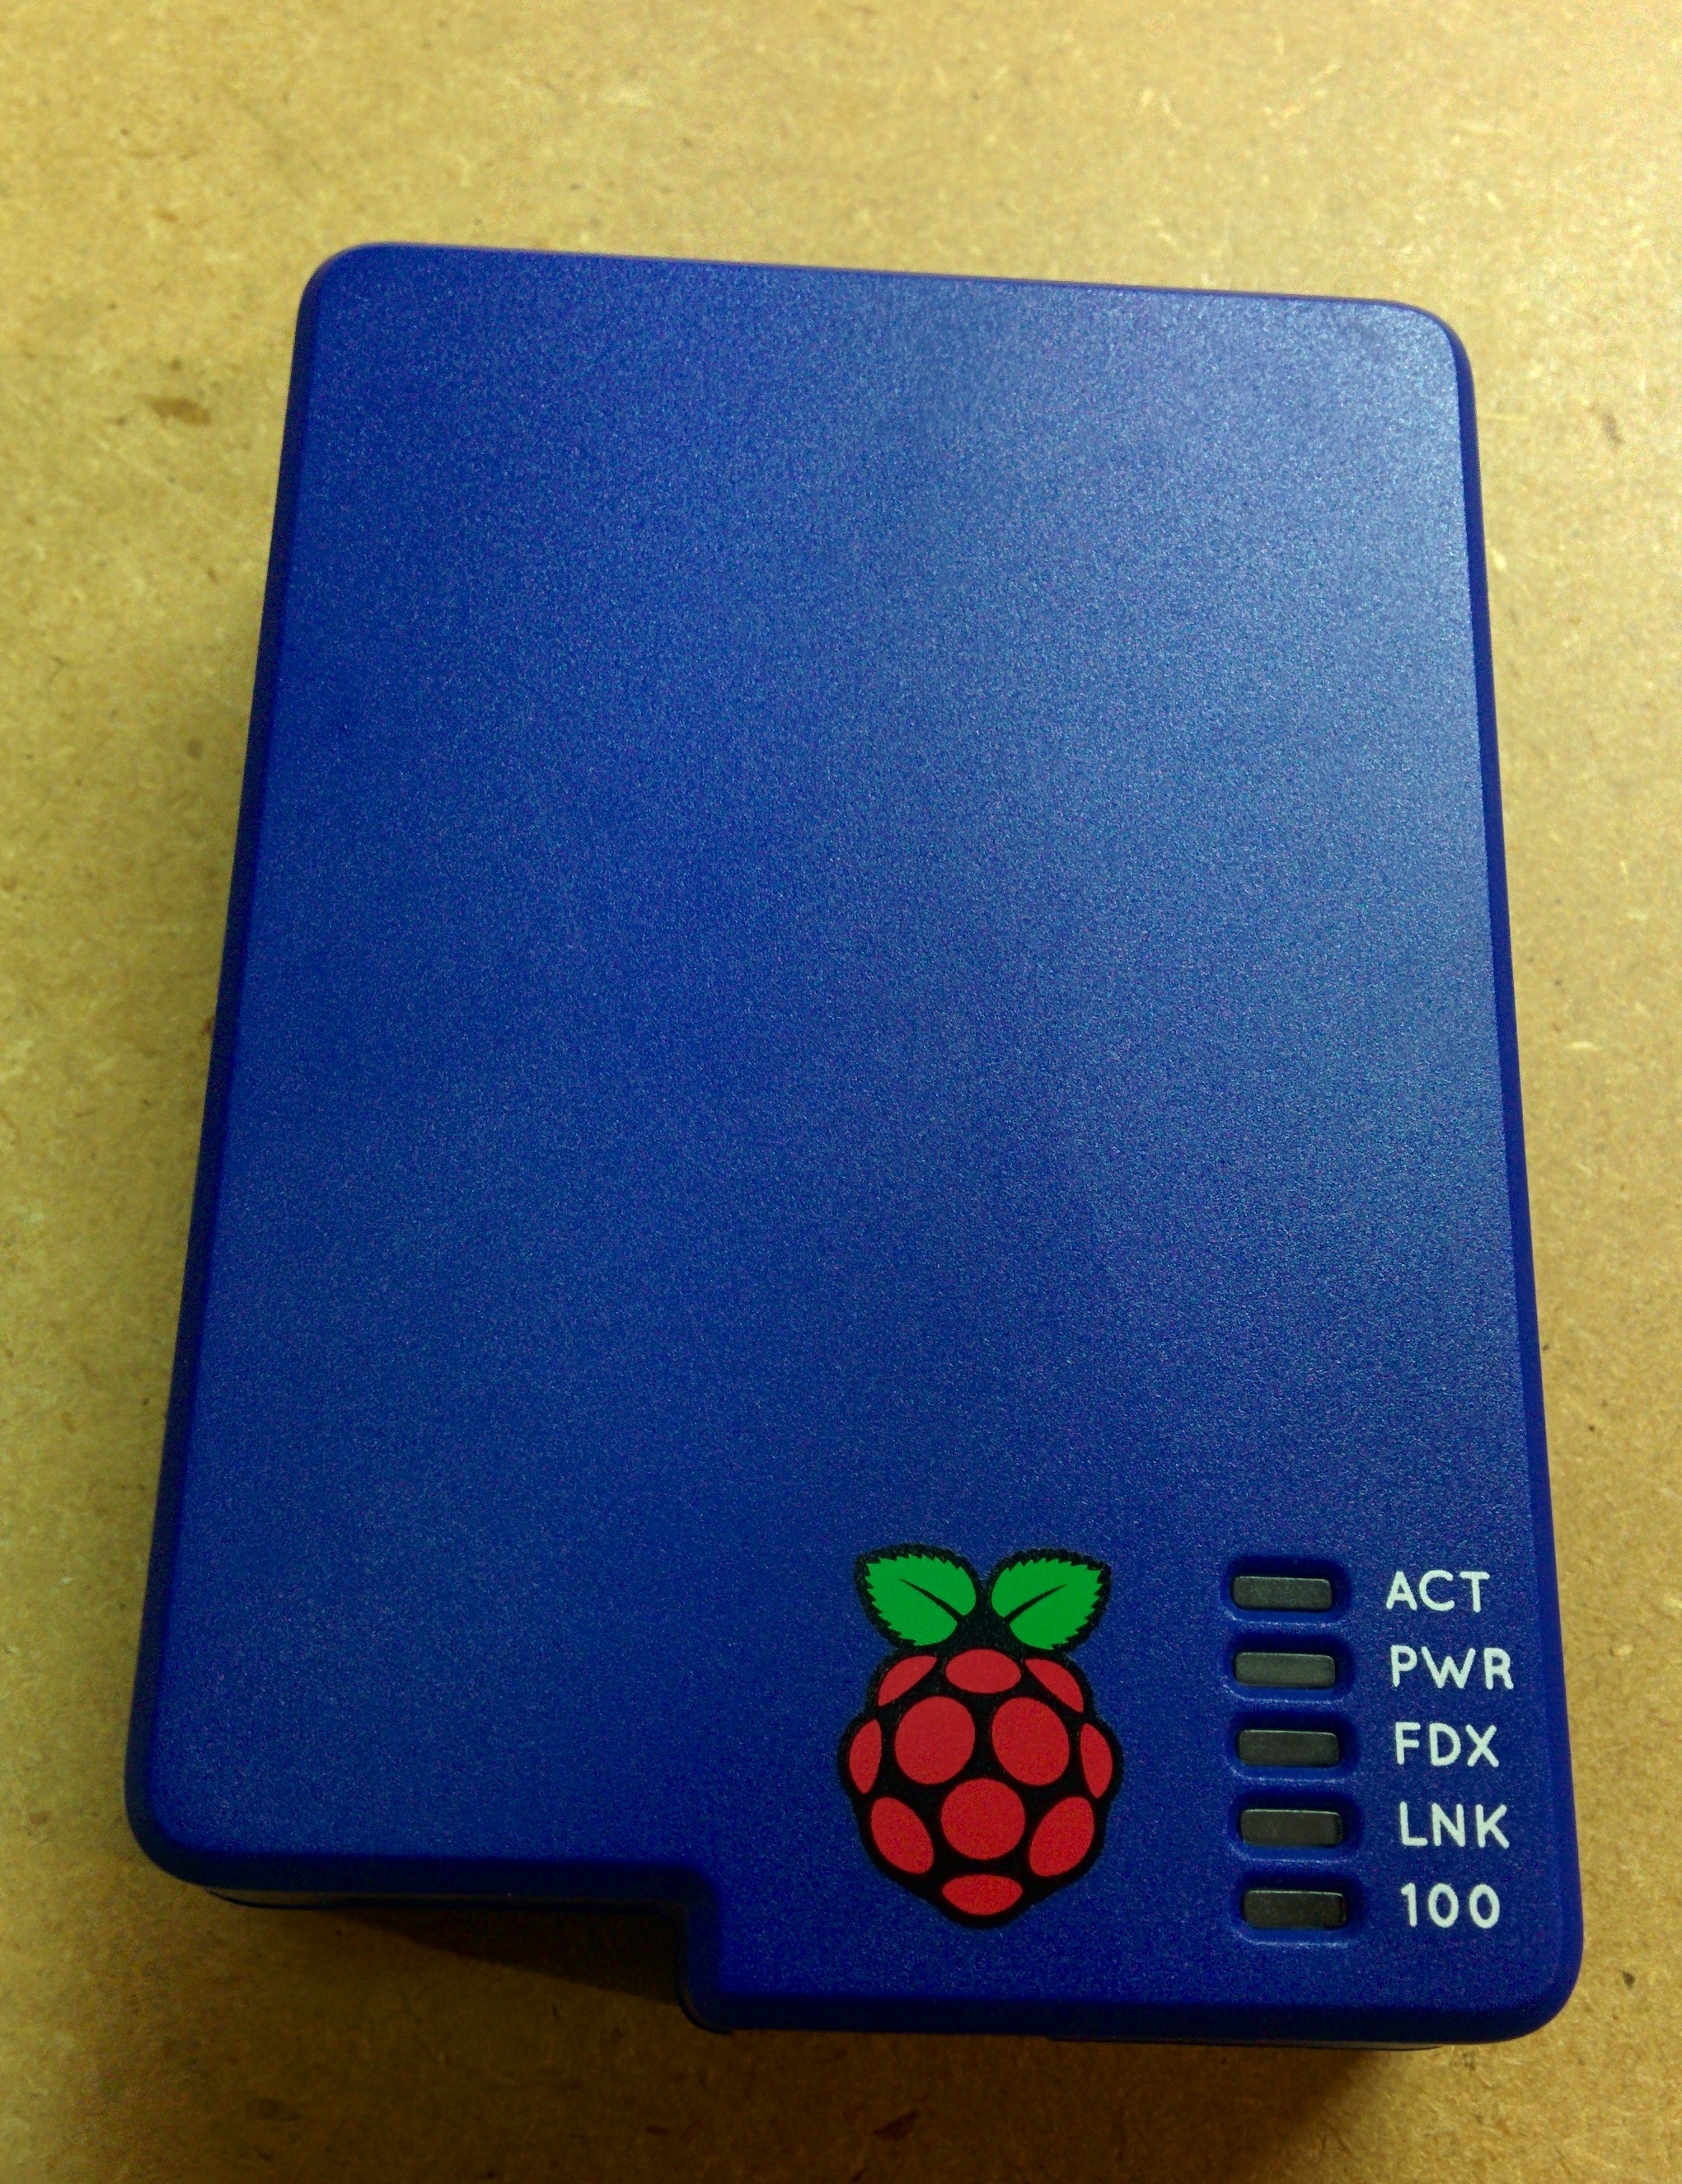
I decided that if my Raspberry was going to find permanent usage in my stack of equipment it needed a real case on it to protect from electrical shorts and other damage. Why I choose the “blueberry” case for the Raspberry, I can’t explain, I guess I just like the look.

Raspberry Pi


I first attempted to get this running on an 8GB Class 2 SD I stole from my wife’s camera. While it was technically functional, it was vvveeerrryyy ssslllooowww, convincing me I needed a proper card like this:

Panasonic Gold Series 8GB Class 10 SDHC Memory Card

http://www.adorama.com/PCSDUB08GAK.html


I also needed a good power supply. The Pi takes about 500-700 mA by itself, significantly more if you plug in a USB stick or WiFi adapter (potentially 500 mA each). I found most typical cell chargers run in to 500 mA-1 A range. I ended using a 1 A charger I had lying around, but I’d recommend something like this:

USA Raspberry Pi Micro USB Power Supply Charger – 5v 1500ma

Alternatively, if you plan to have several devices you’re probably better off with a multi-port charger that can safely supply enough juice:

One word of caution–make sure the charger/power supply is UL listed (or certified by an equivalent regulatory body) . As my father (the electrical inspector) reminded me, if you’re going to run this 24×7 with cables all tucked in a dark corner, the last thing you want to stress about is everything going up in flames because you saved a few dollars buying a cheap charged from Asia.

I went with the standard Raspbian distro downloaded from official sources (http://www.raspberrypi.org/downloads/). The advantage of this is a simple, easy to install distro that is optimized for the Pi, yet resembles standard Debian as closely as possible. The main disadvantage is that it comes loaded with junk not required/desired on a small, headless server. I followed the instructions on this thread to clean up unwanted packages:
http://raspberrypi.stackexchange.com/questions/4745/how-to-uninstall-x-server-and-desktop-manager-when-running-as-headless-server

As of now, I’m down to 800MB of disk space used, and I’m not done yet.

Tasks left to be completed:

  • Continue to search out and remove undesired packages
  • Follow Linux hardening guidelines to make the system more secure
  • Set up remote logging — I have an internal syslog server, but I’m considering trying out https://papertrailapp.com/

Being a busy guy, this posting isn’t nearly as complete and polished as I’d like it to be, but hopefully someone will find it useful.

General OpenSSL Commands

Finding Files or Directories in Linux

find . -type d -exec ls -la {} \;

Debian Server on a Thin Client with a Flash Drive

Recommend 600Mhz+ CPU, 512MB+ RAM, 2GB+ Flash. Raspberry Pi 2 would work great.

On first server (DevonIT 6020A), used internal 128MB IDE Flash for /boot, used external flash for /. Purpose-built internal flash drive is fast for loading kernal. Advantages to this hardware: cheap, built-in power supply.

On second server (Wyse WinTerm?), had trouble with drive re-ordering. Expected same behavior, 512MB flash would be /dev/sda, USB would be /dev/sdb. However, once booting from USB, it became /dev/sda, flash was /dev/sdb. Long story short, went into BIOS and disabled IDE controller. Only disadvantage…slightly slower boot time. Advantage…whole system is on a single removable flash drive that can easily be backed up, replaced, or moved to new hardware. Advantages to this hardware: almost as cheap, newer. External power supply means easier DC power feed.

Use ext2, or see ext3 tweaks at: http://www.cyrius.com/debian/nslu2/linux-on-flash.html

Uncheck GUI, selected DNS, openSSH and base utilities only. Could go back and remove unneeded packages to shrink install even more. Could possible fit in 512MB, but flash is so cheap it’s not worth it unless you are paranoid about security and truly want to limit uneccesary packages. Although that limits future usage as well (no room to play).

Use syslog server for logging

No swap, move all temp directories to ram drive

  • /run
  • /tmp
  • /var

Tweak fstab, remove user mount for USB (what’s the point?)

See http://wiki.debian.org/RunningOnFlash


Useful Tips for Linux

Handy reference on frequently used Bash constructs:

http://www.codecoffee.com/tipsforlinux/index-linux.html

Summarize Unique IP Addresses in a Log File

Loops through each log file and dump output to a single file:

for file in `ls *.log`
do
cat $file |awk '{print $4}' |sort |uniq -c |sort -n >> output.txt
done


Now consolidate entries from each section of original file to a new file:

cat output.txt |awk '{print $2}' |sort |uniq -c |sort -n >> output2.txt

Where the $4 or $2 is the field to look at (space delimitated)

Bash example: Listing files in a directory

Simple example of how to perform an operation on every file in a directory:

for file in `ls *.pdf`
do
 convert -density 300 $file `echo $file | sed 's/\.pdf$/\.jpg/'`
done

OES 2 Installation and Setup

Complete the installation of SLES 10 first as per https://danobarrjr.net/2010/01/sles-10-installation-and-setup.html.

Install OES Components and Configure eDirectory:

  • Start the OES install:
    • YaST: Software, Add-on Product
  • Select Local Directory or NFS (depending on where your ISO images are)
  • If using NFS, specify the source server’s fully qualified name address
  • Check the ISO Image box and set the path to /install/OES2-SP1-x86_64-CD1.iso
  • Select and install the following packages:
    • Novell Backup / Storage Management
    • Novell eDirectory
    • Novell iManager
    • Novell iPrint (if needed)
    • Novell Linux User Management
    • Novell NCP Server
    • Novell Remote Manager
    • Novell CIFS (if needed – only works on NSS volumes)
    • Novell Storage Services (if needed)
  • eDirectory Configuration – New or Existing Tree
    • Select Existing Tree
    • eDirectory Tree Name: (enter the existing tree name)
    • Check Use eDirectory Certificates
  • eDirectory Configuration – Existing Tree Information
    • IP Address of an existing eDirectory server: (use the IP of a server hold a replica of root)
    • FDN Existing admin name: cn=admin,o=xxxxx
    • Enter Admin Password
  • eDirectory Configuration – Local Server Configuration
    • Enter Server Context: ou=Servers,ou=Sitename,o=XXXX
  • eDirectory Configuration – NTP & SLP
    • Network Time Protocol Server: (use the IP address of a server holding the master replica of root)
    • Select Configure SLP to use an existing Directory Agent
    • Service Location Protocol Scopes: (enter your scope name)
    • Add SLP Directory Agents: XX.XX.XX.XX
  • Novell Modular Authentication Service – accept defaults
  • You’ll now be at the Novell Open Enterprise Server Configuration summary screen
  • Click on LDAP Configuration for Open Enterprise Services
    • Remove the IP address of your master replica server
  • Click on Linux User Management
    • Accept the defaults on the first screen
    • Select All services to LUM-enable
  • IF installing CIFS, click on Novell CIFS
    • Change the Proxy user name to: cn=cifsProxyUser,o=xxxx
    • Set Search context to o=DOC
    • Set the Proxy user password
  • Click Next on the summary screen to start the installation into eDirectory
  • There will be a few miscellaneous prompts to respond to, such as to restart eDirectory
  • iManager/ConsoleOne Tasks:

    • Add an eDirectory replica to new server:
      • In iManager, go to Partition and Replica Management, Replica View
      • Enter SITE.XXXX, click OK
      • Click Add Replica. Select the new server and click OK.

    Configure NSS (not needed if only re-installing the OS for a failed server – following these steps will delete existing NSS pool/volumes):

    • Run nssmu from the command shell
    • Go to Devices, select the logical drive for the NSS pool, and hit F3 to Initialize it (be careful, make sure you have selected the correct drive!)
    • Create new pool named DATA using all of the logical drive
    • Create new volumes on DATA pool

    Turn off oplocks:

    • Edit /etc/opt/novell/nspserv.conf and make sure it has these two lines:
      • OPLOCK_SUPPORT_LEVEL 0
      • CROSS_PROTOCOL_LOCKS 1
    • This change requires a restart of NCP server (reboot)

    Register and Patch the server:

    • Register the server with Novell:
      • At the command prompt:
        suse_register -a email=xxx@xxxxx -a regcode-sles=XXXXXXXXXXXX -a regcode-oes=XXXXXXXXXXXX

    • Update the server using YaST, Software, Online Update (this works in text mode with screen)

    Updating Java on SLED 10


    How to install the latest version of Sun Java JRE on SLED 10 and use it as default.

    Download and installing the latest version of Java:

    • Download and install the latest Sun Java RPM.
    • Use su to become root for the rest of these steps.
    • Set the downloaded file to executable (chmod +x) and run it.
    • Accept the license agreement, and it will the extract the RPM and install the JRE to /usr/java.
    • The installer will automatically update the symlink /usr/java/latest to point at the most recently installed JRE.

    The following steps are performed the first time only. For future updates, just follow the above steps to download and install the latest version, and everything should use the new version automatically.

    To make it the default JRE for your system:

    • cd /usr/lib/jvm
    • rm jre (it should be a symlink)
    • ln -s /usr/java/latest jre

    To make it the default JRE for GroupWise Client:

    • cd /opt/novell/groupwise/client
    • rm -rf jre (GroupWise installs its own JRE, you can delete or just rename with mv jre jre.bkp)
    • ln -s /usr/java/latest jre

    To make it the default JRE for GroupWise Messenger:

    • cd /opt/novell/messenger/client
    • rm -rf jre (Messenger installs its own JRE, you can delete or just rename with mv jre jre.bkp)
    • ln -s /usr/java/latest jre

    To make it your default JRE for FireFox:

    1. cd /usr/lib/firefox/plugins
    2. rm libjavaplugin_oji.so
    3. ln -s /usr/java/latest/libjavaplugin_oji.so
    4. cd /usr/lib/mozilla/plugins
    5. Repeat steps 2 & 3
    6. cd /usr/lib/browser-plugins
    7. Repeat steps 2 & 3

    Possibly you don’t need to add the symlink to all three locations for FireFox, but it takes essentially no space on disk and guarantees you get the latest version loaded.

    Blue Coat SSL Reverse Proxy Setup

    Conceptual Overview:

    This document describes the steps necessary to deploy a new web application via a reverse HTTPS proxy on the Blue Coat Proxy SG. It involves setting up a virtual IP address on the Blue Coat that is servicing the web servers, and using the proxy to terminate an SSL connection from the client to that address. It will then forward the request to the servers themselves, in a load balanced manner. In order to provide full acceleration from other locations, we will need to set up a SSL intercept on each remote proxy, causing it to intercept the connection and forward it across the ADN to the master that is actually servicing the (virtual) website.

    Set up Virtual IP (VIP) Address on Servicing Blue Coat Proxy:

    • Use the Infoblox Grid Manager to choose an unused IP address in the app server subnet, and add a host record with that address and the corresponding URL for your virtual host, such as virtualserver.example.com
      • (I will add a link here to the Infoblox instructions when I post them.)
    • Configuration -> Network -> Advanced -> VIPs
    • Click New, enter the virtual IP address
    • Click OK and Apply to save the configuration
    • You should now be able to ping the virtual IP address by DNS name (ping virtualserver.example.com)

    Set up Forwarding Hosts:

    • Configuration -> Forwarding -> Forwarding Hosts -> New
    • Enter the following values:
      • Alias: a simple descriptive name, such as the host name (webserver1)
      • Host: the fully qualified host name (webserver1.example.com)
      • Ports: check HTTP and enter the host server port (in this case, we use 7778 since the web site is hosted on Oracle HTTP server)
    • Click OK
    • Repeat the above steps for each host that will service this virtual host
    • Click Apply to save

    Set up Forwarding Group:

    • Configuration -> Forwarding -> Forwarding Groups -> New
    • Enter a descriptive group name
    • Select each host server that will service the website and click Add
    • Click OK and Apply to save

    Set up SSL Access Policy in VPM:

    • Configuration -> Policy -> Visual Policy Manager -> Launch
    • Click on SSL Access Layer tab. If this did not already exist, you would add one by:
      • Click on Policy -> Add SSL Access Layer
      • Give it a descriptive name (SSL Access Layer, for example)
      • Click OK
    • Click Add Rule
    • If necessary, use the Move Up or Move Down buttons to change the order of this rule
    • Right-click on the word Any under the Destination column in the rule you just added and select Set
    • Click New, select Server URL
    • Set up your matching parameters and click Add, Close, OK
      • In our current example, we’d use Simple Match, and enter the virtual host URL, virtualserver.example.com
      • Note: You could also create a new Combined Destination Object to create a list of URLs
    • Right-click on the word None under the Action column in the rule you just added and select Set
    • Select Allow and click OK to save

    Set up Forwarding Policy in VPM:

    • If not already in the VPM, go to Configuration -> Policy -> Visual Policy Manager -> Launch
    • Click on the Forwarding Layer tab. If this did not already exist, you would add one by:
      • Click on Policy -> Add Forwarding Layer
      • Give it a descriptive name (Forwarding Layer, for example)
      • Click OK
    • Click Add Rule
    • If necessary, use the Move Up or Move Down buttons to change the order of this rule
    • Right-click on the word Any under the Destination column in the rule you just added and select Set
    • Select the same Destination URL that you added under the SSL Access Policy and click OK
    • Right-click on the word Send Direct under the Action column in the rule you just added and select Set
    • Click New, select Select Forwarding
    • Enter a descriptive name (no spaces)
    • Under Forward to:, select the forwarding group you created earlier and click Add, OK, OK
    • Click Install Policy, then close the VPM

    SSL Notes:

    You have two options to create the SSL private key and your certificate signing request (CSR). The Blue Coat interface is easier to understand, but openSSL is sometimes more compatible. (NOTE: iManager would not issue a wild card certificate from a CSR generated on the Blue Coat, requiring me to use openSSL.)

    Create New Keyring and Generate Private Key:

    These instructions assume you are creating the key with the Blue Coat management interface.

    • Start by creating a new keyring: Configuration -> SSL -> Keyrings -> Create
    • Enter a keyring name.
      • For all of our internal web apps, we are using a wildcard certificate for (*.example.com), so we use something like wildcard.example.com-key as the keyring name.
    • If you want to back up the private key or use it on any other device, select Show key pair or Show key pair to director. For greatest security, leave it set to Do not show key pair.
    • For all internal purposes, we use 2048 bits.
      • 1024 bits is virtually unbreakable without a supercomputer or large cluster of computers, so it is not insecure, we just use the same number of bits as the default SSH keys on SuSE.
      • If you will be requesting a certificate from a recognized certificate authority, the number of bits should correspond to the certificate product you will order.
    • Click OK, then Apply to save the new keyring.

    Generate Private Key with openSSL:

    • (I will insert a link when I post these instructions.)
    • Create a new keyring as described above, but instead of creating a new key, select Import
    • Copy and paste in your private key generated with openSSL

    Generate Certificate Signing Request (CSR):

    These instructions assume you are creating the CSR with the Blue Coat management interface.

    • Click on the new keyring and click Edit
    • Under Certificate Signing Request, click Create
    • Fill out the fields similar to the following:
      • State/Province: Nevada
      • Country Code: US
      • City/Locality: Las Vegas
      • Organization Name: Examples-R-Us, Inc.
      • Unit: IT Department
      • Common Name: virtualserver.example.com
      • Challenge: (Blue Coat requires an entry, openSSL does not, since this is optional)
      • Email Address: mail@example.com
      • Company: Examples-R-Us
    • Click OK, Close and then Apply. This will save the new keyring and generate the CSR.
    • Click on the keyring and click Edit.
    • Copy the contents of Certificate Signing Request box and save to a file (virtualserver.example.com, for example).

    Generate CSR with openSSL:

    • (I will insert a link when I post these instructions.)
    • It is possible to import your CSR into the keyring if desired. This would be handy if you wanted to use the same CSR later to generate another certificate (perhaps with a new expiration date).

    Issue Certificate from iManager and Import:

    • (I will insert a link when I post these instructions.)

    Set Up SSL Intercept Service:

    • Configuration -> Services -> Proxy Services -> New Service
    • Enter a Name for your service, such as Example SSL Proxy
    • Under Service Group, select the group (this is just for organizational purposes, it’s not a critical step)
    • Under Proxy settings, Proxy, select HTTPS Reverse Proxy from the drop-down
    • Under the Keyring drop-down, select the keyring you created above
    • At the bottom, click New to create a new listener
    • Choose Destination host or subnet
    • Enter the virtual IP address (VIP) you created in the beginning
    • Click OK, OK, Apply to save

    If you have done everything correctly, you should now be able to open a web browser and type in https://virtualserver.example.com/ and get your website!

    Optional – Set Up URL Rewriting:

    The Blue Coat Proxy allows you to re-write the request URL. So for example, you can allow the user to enter a “pretty” URL, and hide the actual request string that is sent to to the host server.

    • Install the re-write policy by going to Policy -> Policy Files -> Install Local File From -> Text Editor-> Install
    • Sample rewrite policy:
    • define action virtualserver_example_com_portal
      rewrite(url, “^https://virtualserver.example.com/$”,”https://virtualserver.example.com/prod/”)
      end

      define action force_uncompressed
      delete(request.header.Accept-Encoding)
      end

      <Proxy>
      url.host=virtualserver.example.com action.virtualserver_example_com_portal(yes)

      <Cache>
      action.force_uncompressed(yes)